製品番号 20200707-001
AKVIS AirBrush Video for Mac
AKVIS AirBrush Video for Mac
バージョン 1.6
更新日付 2021/12/21 10:09:59 (Tue)
開発元 AKVIS
The trial version has a 30-day trial period and includes the AKVIS watermark.
Couldn't load pickup availability
ライセンスに関して Home License is for private individuals. It can only be used for non-commercial purposes. Pro License is for commercial organizations that use the software commercially. AKVIS products come with a lifetime license and one year of free updates. One license can be used on two computers.
互換OS macOS 15.x
共有


購入時の注意
You can upgrade to new versions of the product free of charge for one year.
If you wish to update after the one-year free update period has expired, you will need to purchase the update.
Please contact us regarding updates.
製品情報
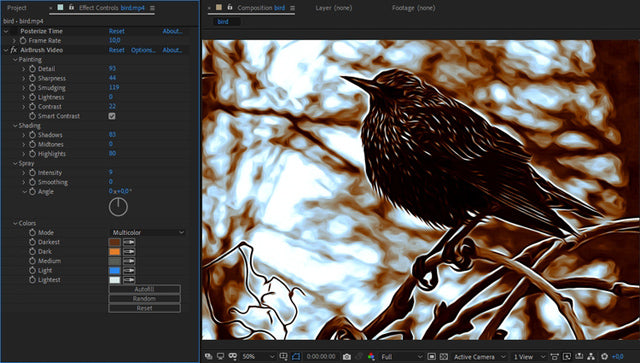
AKVIS AirBrush Video creates a spray paint effect for your video.
You can create eye-catching and stunning videos with vibrant colors, shading, shadow effects, etc. Let your imagination take you by storm and become an artist!
製品詳細情報
製品情報の詳細1を見る
|
AKVIS AirBrush Video
AKVIS AirBrush Video creates a spray paint effect for your video. The AKVIS AirBrush Video plugin can be used in After Effects, Premiere Pro and other video editing programs. 
The plugin adds depth and visual effects to your videos that will immerse your audience, making them more eye-catching, full of movement and energy. 
AKVIS AirBrush Video comes with a large number of ready-to-use presets. You can use them as they are or modify them to create your own. The plugin is highly configurable and gives you complete control over the effect settings to suit your preferences. 
How to use the AirBrush Video Plugin
AKVIS Sketch Video Classic turns your video into a hand-drawn drawing style. Step 1. Open the project in a video editor. For videos with low contrast, you can use Curves. 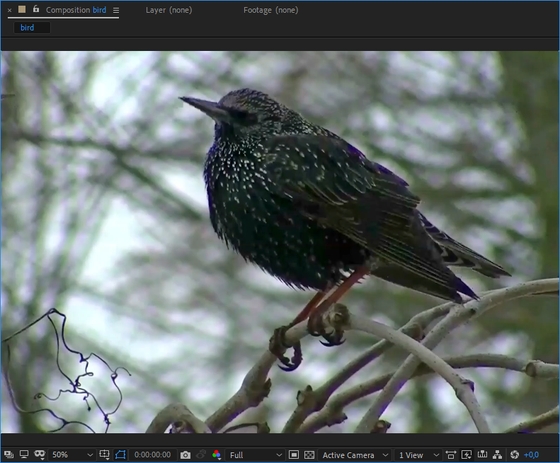
Step 2. Apply the AKVIS AirBrush Video plugin. 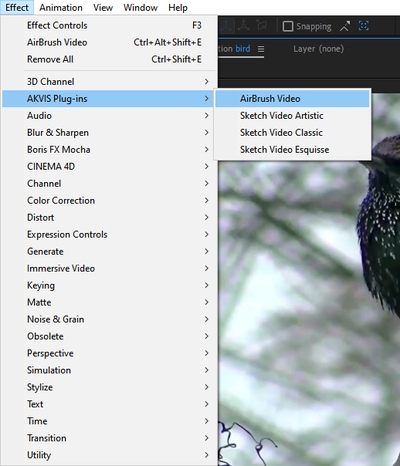
In Adobe After Effects, select AKVIS Plugins>AirBrush Video from the Effects and Presets panel (or the Effects menu) and drag the effect to the Composition panel. 
In Adobe Premiere, select Effects -> Video Effects -> AKVIS Plugin -> AirBrush Video and drag it to the timeline. 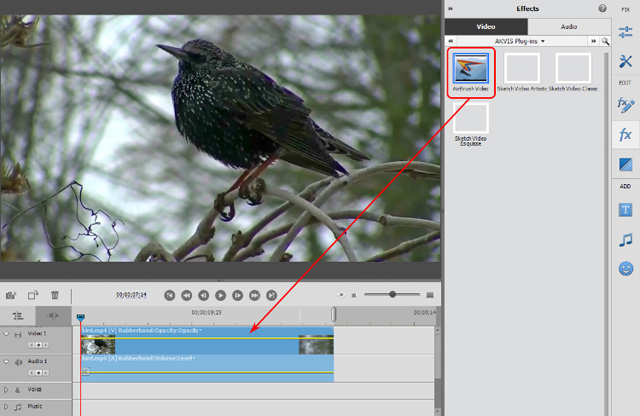
The airbrush effect will be displayed in the current frame. 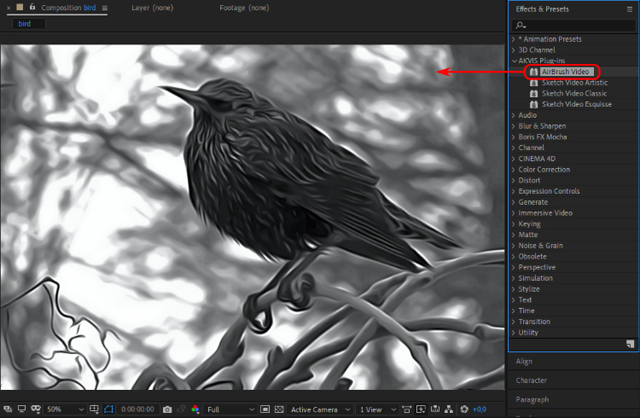
Step 3. Adjust the AirBrush Video settings in the Effect Control Panel. To reset a parameter to its default value: Note: You can also use one of the pre-defined AKVIS presets. 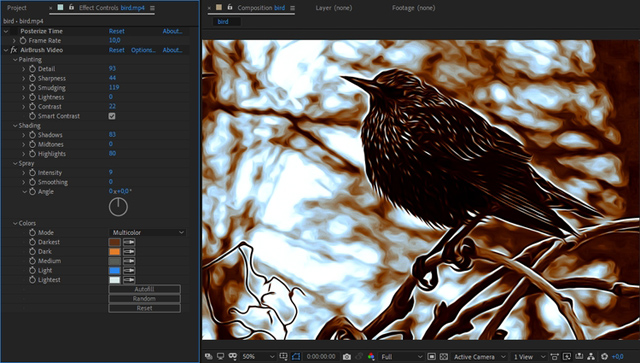
Step 4. You can save your favorite settings as a preset. Step 5. Save the video. Adobe After Effects : Select Configure > Add to Render Queue. In the Render window, choose a destination folder, specify a file name and conversion settings. Click the Render button. Adobe Premiere Pro : Select your clips in the Project panel and choose File > Export > Media. After adjusting the settings in the Export Settings window, click the Queue button to complete the export using Adobe Media Encoder. Adobe Premiere Elements , click Export and Share on the Premiere Elements toolbar, adjust the format settings, and then click Save. Alternatively, you can use the File > Export and Share command. EDIUS Pro , select File > Export > Print to file, and then click Export. |
製品情報の詳細2を見る
AKVIS AirBrush Video Plugin for Mac User Guide1970/01/01 09:00:00 (Thu)
Collapsible content
よくある質問
I entered the serial number but an error occurred and I can't activate it.
The serial number (activation key) you enter into your AKVIS product will be a 12-digit number consisting of random alphanumeric characters.
If you purchased your product from SourceNext or another company, you may have been issued multiple serial numbers, but in many cases, you may have entered the wrong number, resulting in an error.
Please make sure to enter the license number issued for your AKVIS product.
It is also possible that you have mistakenly entered something that is easily confused, such as an O or a zero.
Whenever possible, we recommend using copy and paste instead of entering information manually.
If you enter your name in Japanese, the characters will be garbled, so please enter it in Roman letters.
Can I install it on multiple PCs?
All AKVIS products, except AliveColors, can be installed on up to two PCs by the same person.
It can be installed on two computers, meaning that activation with the same key can only be performed twice.
AliveColors, both the Home and Business versions, can only be installed on one PC.
Program upgrades can be performed by simply overwriting the latest version without activation.
If for any reason you need to reinstall and activate more than once, please contact us with your purchase information.
The Japanese version of AKVIS cannot automatically detect the Photoshop Plug-ins folder during installation.
In a 32-bit environment it is located in [Program Files], in a 64-bit environment it is located in [program files (x86)] and under it there are folders for each product.
There is a .8bf file in that folder, so please copy it manually and place it in the Photoshop [Plug-ins] folder.
***.8bf is the 32-bit version and ***_64.8bf is the 64-bit version.
Plugins with different versions will not be displayed, so be sure to copy the one that matches your environment.
A plug-in is a program that adds new features to existing software or enhances its functionality.
AKVIS has developed a variety of plugins compatible with popular image editing software such as Adobe Photoshop.
For example, if you use AKVIS products as plug-ins for Adobe Photoshop, you can edit images with AKVIS products by downloading them from Adobe Photoshop.
You can edit the image area back in AKVIS products.
AKVIS plugins are compatible with Adobe products as well as with most popular image editing software. Check compatibility with the trial version.
If you purchase the plug-in version, it cannot be used as a standalone application.
2. Reactivate
2. Select [Effect] at the top
3. Select [OpenFX] from [Effect] displayed on the left
4. Find AKVIS in the list and select the product.
5. Click [About AKVIS *** Video] on the right
6. The activation screen will appear.
アクティベーション方法
The activation method isHereSee


