

製品番号 20080630-002
AKVIS Magnifier AI
AKVIS Magnifier AI
バージョン 12.2
更新日付 2025/11/27
開発元 AKVIS
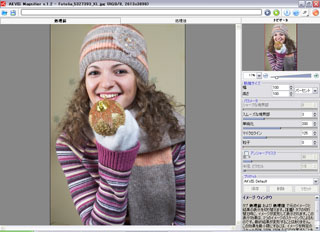
簡単に高品質で画像のリサイズが可能です。
フォトエディタの標準的なリサイズ機能を使って写真の解像度を上げると、ぼやけてピクセルの目立つ写真になってしまうことが分かると思います。
元画像には、画像を大きくリサイズするための十分な情報が入っていないことが原因です。
AKVIS Magnifierは、この問題に対処し品質の良いリサイズ(解像度の拡大)を可能にします。
広告業界をはじめ、フォトスタジオ、デザイン事務所の方、写真家やDTPデザイナーの皆様必見です!


Couldn't load pickup availability
ライセンスに関して AKVIS Magnifier エディションによる違いについて Home ライセンス Homeライセンスは、個人利用のみを目的とするライセンスです。商用目的に利用することはできません。 本ライセンスは、購入時にプラグイン版またはスタンドアロン版のどちらか片方を選択します。アクティベーションキーは購入した版に対してのみ有効です。購入後の変更はできませんのでご注意下さい。 通常(必ずしも全製品に該当するわけではありませんが)、上位バージョン (Deluxe や Business)に比べて機能は減少されますが、個人ユーザのニーズに十分お答えできます。 Homeライセンスは、最大2台のコンピュータで利用することができます (例: デスクトップとラップトップにインストールして利用する)。 Home Deluxe ライセンス Home Deluxeライセンスは、Homeライセンスの高度なバージョンです。これも、また、個人利用のみを目的とするライセンスです。 本ライセンスは、プラグイン版およびスタンドアロン版の両方に有効です。また、本ライセンスタイプはライセンスの柔軟性だけでなく、より多くの機能をお楽しみいただけます。本ライセンスはソフトウェアに対する要求を高くお持ちのプロの方や上級ユーザを対象としています。 Home Deluxeライセンスは、最大2台のコンピュータで利用することができます (例: デスクトップとラップトップにインストールして利用する)。 Business ライセンス Businessライセンスは、本ソフトウェアの利用により利益が発生する営利団体や個人を対象としたライセンスです。 本ライセンスは、プラグイン版およびスタンドアロン版の両方に有効です。また、本ライセンスタイプは全ての機能を提供します。 Businessライセンスは、最大2台のコンピュータで利用することができます (例: デスクトップとラップトップにインストールして利用する)。
互換OS Windows 10 64bit and Windows 11 64bit


製品情報
製品情報の詳細1を見る
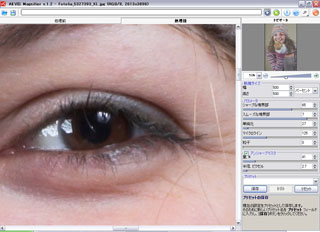
画像の一部を5倍に拡大処理し、50%で表示している画面です。
製品情報の詳細2を見る
| ライセンス比較: | Home (Plugin) |
Home (Standalone) |
Home Deluxe (Plugin+Standalone) |
Business (Plugin+Standalone) |
| 使用目的 | ||||
| 非商用 | ||||
| 商用 | ||||
| エディション | ||||
| プラグイン |
||||
| スタンドアロン |
||||
| 機能 | ||||
| 縮小 | ||||
| 拡大 | ||||
| 切り取りツール | ||||
| プリセット | ||||
| バッチ処理 | ||||
| 印刷 | ||||
| GPUアクセラレーション | ||||
| EXIF、IPTC | ||||
| カラースペース | ||||
| RGB | ||||
| CMYK | ||||
| Lab | ||||
| Grayscale | ||||
| 8 / 16 bits | ||||
| 32 bits | ||||
| イメージ フォーマット | ||||
| TIFF | ||||
| JPEG | ||||
| BMP | ||||
| PNG | ||||
| RAW | ||||
| DNG | ||||
| PSD | ||||
よくある質問
[Regarding license issuance/reissue] Can I install it on multiple PCs?
All AKVIS products, except AliveColors, can be installed on up to two PCs by the same person.It can be installed on two computers, meaning that activation with the same key can only be performed twice.
AliveColors, both the Home and Business versions, can only be installed on one PC.
Program upgrades can be performed by simply overwriting the latest version without activation.
If for any reason you need to reinstall and activate more than once, please contact us with your purchase information.
[TECHNICAL] How to install AKVIS plugin in Photoshop
To install a plug-in in Photoshop, copy the plug-in file into Photoshop's plug-ins folder.Copy the file that ends with .8bf (e.g. Enhancer.8bf) for the 32-bit version, or _64.8bf (e.g. Enhancer_64.8bf) for the 64-bit version.
The locations are as follows.
Photoshop CC 2019:
C:\Program Files\Adobe\Adobe Photoshop CC 2019\Plug-ins\
Photoshop CC 2018:
C:\Program Files\Adobe\Adobe Photoshop CC 2018\Plug-ins\
Photoshop CC 2017:
C:\Program Files\Adobe\Adobe Photoshop CC 2017\Plug-ins\
Photoshop CC 2015.5:
C:\Program Files\Common Files\Adobe\Plug-Ins\CC\
Photoshop CC 2015:
C:\Program Files\Adobe\Adobe Photoshop CC 2015\Plug-ins\
Photoshop CC 2014:
C:\Program Files\Adobe\Adobe Photoshop CC 2014\Plug-ins\
Photoshop CS6:
C:\Program Files\Adobe\Adobe Photoshop CS6 (64 Bit)\Plug-ins\
[Technical Question] Installing Plugins in Corel Paint Shop Pro
If the installation of Corel Paint Shop Pro or other programs fails, you can install them manually using the following method.During installation uncheck the programs and install AKVIS products in the default folder.
(The default is the Program Files folder.)
Copy the *.8bf file (for example, for AKVIS Sketch it is called "Sketch.8bf" in the C:\Program Files\AKVIS\Sketch folder) to the Paint Shop Pro plugins folder.
[Technical Question] What is a Plugin?
A plug-in is a program that adds new features to existing software or enhances its functionality.AKVIS has developed a variety of plugins compatible with popular image editing software such as Adobe Photoshop.
For example, if you use AKVIS products as Adobe Photoshop plug-ins, you can edit any image area in AKVIS products and then bring it back to Adobe Photoshop.
AKVIS plugins are compatible with Adobe products as well as popular image editing software. Check compatibility with the trial version.
If you purchase the plug-in version, it cannot be used as a standalone application.
[Technical Question] Plug-in won't install in Photoshop
Japanese AKVIS products cannot automatically detect the Photoshop Plug-ins folder during installation.In a 32-bit environment it is located in [Program Files], in a 64-bit environment it is located in [program files (x86)] and under it there are folders for each product.
There is a .8bf file in that folder, so please copy it manually and place it in the Photoshop [Plug-ins] folder.
***.8bf is the 32-bit version and ***_64.8bf is the 64-bit version.
Plugins with different versions will not be displayed, so be sure to copy the one that matches your environment.
How to activate AKVIS products (I purchased it but it expired and I can't use it)
Activation is required to use the product as a retail version.The trial version has a 10-day usage limit, and you will no longer be able to use it after the limit has expired, so be sure to activate it.
Activation is possible even after the expiration date.
1. Launch the product
2. Click the [Activate] button in the window that appears.
3. Enter your name (in Roman letters) and activation key
4. Click the [Activate] button
5. If authentication is successful, the product will be installed.
*If you purchased from Sourcenext, two types of keys will be issued. Please enter the 12-digit serial number. The 21-digit serial number is used on Sourcenext and is not the activation key for AKVIS products.
[Operation method] How to change the display language to Japanese
1. Click the gear icon in the top right corner of the window. 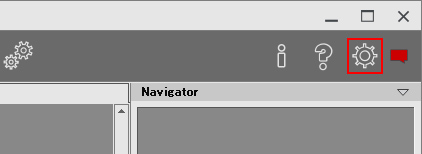
2. Click the [Language] drop-down at the top. 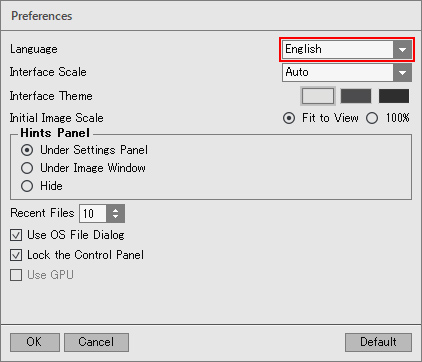
3. Select [Japanese]. 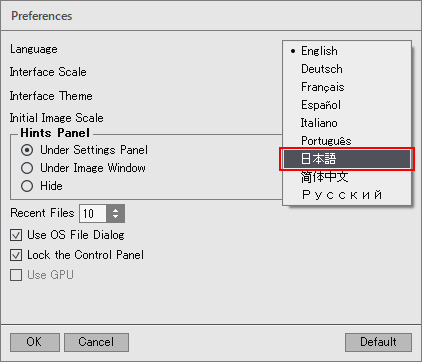
4. Click [OK] to switch the display to Japanese. 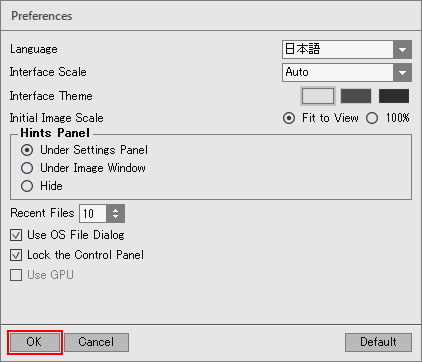
[Other] I entered the serial number but an error occurred and I can't activate it
The serial number (activation key) you enter into your AKVIS product will be a 12-digit number consisting of random alphanumeric characters.If you purchased your product from SourceNext or another company, you may have been issued multiple serial numbers, but in many cases, you may have entered the wrong number, resulting in an error.
Please make sure to enter the license number issued for your AKVIS product.
It is also possible that you have mistakenly entered something that is easily confused, such as an O or a zero.
Whenever possible, we recommend using copy and paste instead of entering information manually.
If you enter your name in Japanese, the characters will be garbled, so please enter it in Roman letters.