


製品番号 20050216-002
AKVIS Retoucher
AKVIS Retoucher
バージョン 12.1
更新日付 2024/08/05 11:30:14 (Mon)
開発元 AKVIS
Retoucher を使って、ダメージ写真上のゴミ、擦り傷、薄片、しみ、水滴やその他欠陥を取り除くだけでなく、画像内の大きなオブジェクトもきれいに取り除くことができます。
プロフェッショナルでさえも時間の掛かるゴミや擦り傷のあるイメージの編集も、手動で作業していては時間が掛かってしまいます。
AKVIS Retoucher を使って、欠損をマウスクリック一つで取り除くことができ、作業時間を短縮することができます。
ピクチャを修復する場合、必要のないオブジェクトを選択する必要があります(擦り傷、日付表示など)、ボタンを押すだけで表面がスムーズになり不自然さが消滅します。 目の前で擦り傷が消えるのを見ているとまるでマジックを見ているようです。
AKVIS Retoucher は、表面の損傷修復作業の生産性を向上するための信頼性のあるツールです。
AKVIS Retoucher はスタンドアロンでもプラグインでも動きます。
プラグイン版はイメージ処理プログラムのプラグインとして動作します。Adobe Photoshop, Photoshop Elements, Jasc Paint Shop Pro, Ulead PhotoImpact,などと互換性があります。
評価版は10日間利用することができます。
 32bit版:akvis-retoucher-setup_shareedge.exe
64bit版:akvis-retoucher-setup_shareedge-x64.exe

Couldn't load pickup availability
ライセンスに関して
互換OS Windows 10 32bit, Windows 10 64bit, and Windows 11 64bit


製品情報
製品情報の詳細1を見る
|
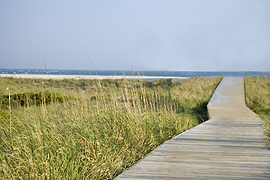
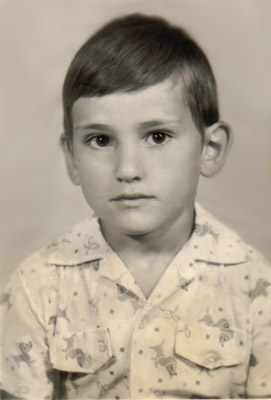
[エフェクト実例] 写真から大きなオブジェクトを消去します
|
|
【例1】
|
| エフェクト前 |
 |
|
↓
|
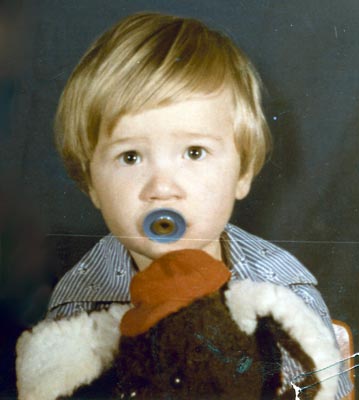
| エフェクト後 |
 |
|
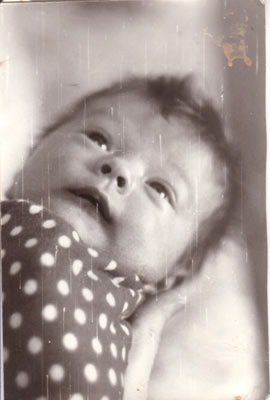
【例2】
|
| エフェクト前 |
 |
|
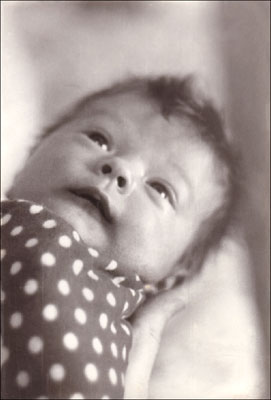
↓
|
| エフェクト後 |
 |
|
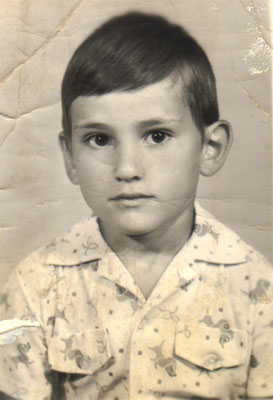
【例3】
|
| エフェクト前 |
 |
|
↓
|
| エフェクト後 |
 |
|
【例4】
|
| エフェクト前 |
 |
|
↓
|
| エフェクト後 |
 |
|
【例5】
|
| エフェクト前 |
 |
|
↓
|
| エフェクト後 |
 |
製品情報の詳細2を見る
よくある質問
[Regarding license issuance/reissue] Can I install it on multiple PCs?
All AKVIS products, except AliveColors, can be installed on up to two PCs by the same person.It can be installed on two computers, meaning that activation with the same key can only be performed twice.
AliveColors, both the Home and Business versions, can only be installed on one PC.
Program upgrades can be performed by simply overwriting the latest version without activation.
If for any reason you need to reinstall and activate more than once, please contact us with your purchase information.
[TECHNICAL] How to install AKVIS plugin in Photoshop
To install a plug-in in Photoshop, copy the plug-in file into Photoshop's plug-ins folder.Copy the file that ends with .8bf (e.g. Enhancer.8bf) for the 32-bit version, or _64.8bf (e.g. Enhancer_64.8bf) for the 64-bit version.
The locations are as follows.
Photoshop CC 2019:
C:\Program Files\Adobe\Adobe Photoshop CC 2019\Plug-ins\
Photoshop CC 2018:
C:\Program Files\Adobe\Adobe Photoshop CC 2018\Plug-ins\
Photoshop CC 2017:
C:\Program Files\Adobe\Adobe Photoshop CC 2017\Plug-ins\
Photoshop CC 2015.5:
C:\Program Files\Common Files\Adobe\Plug-Ins\CC\
Photoshop CC 2015:
C:\Program Files\Adobe\Adobe Photoshop CC 2015\Plug-ins\
Photoshop CC 2014:
C:\Program Files\Adobe\Adobe Photoshop CC 2014\Plug-ins\
Photoshop CS6:
C:\Program Files\Adobe\Adobe Photoshop CS6 (64 Bit)\Plug-ins\
[Technical Question] Installing Plugins in Corel Paint Shop Pro
If the installation of Corel Paint Shop Pro or other programs fails, you can install them manually using the following method.During installation uncheck the programs and install AKVIS products in the default folder.
(The default is the Program Files folder.)
Copy the *.8bf file (for example, for AKVIS Sketch it is called "Sketch.8bf" in the C:\Program Files\AKVIS\Sketch folder) to the Paint Shop Pro plugins folder.
[Technical Question] What is a Plugin?
A plug-in is a program that adds new features to existing software or enhances its functionality.AKVIS has developed a variety of plugins compatible with popular image editing software such as Adobe Photoshop.
For example, if you use AKVIS products as Adobe Photoshop plug-ins, you can edit any image area in AKVIS products and then bring it back to Adobe Photoshop.
AKVIS plugins are compatible with Adobe products as well as popular image editing software. Check compatibility with the trial version.
If you purchase the plug-in version, it cannot be used as a standalone application.
[Technical Question] Plug-in won't install in Photoshop
Japanese AKVIS products cannot automatically detect the Photoshop Plug-ins folder during installation.In a 32-bit environment it is located in [Program Files], in a 64-bit environment it is located in [program files (x86)] and under it there are folders for each product.
There is a .8bf file in that folder, so please copy it manually and place it in the Photoshop [Plug-ins] folder.
***.8bf is the 32-bit version and ***_64.8bf is the 64-bit version.
Plugins with different versions will not be displayed, so be sure to copy the one that matches your environment.
How to activate AKVIS products (I purchased it but it expired and I can't use it)
Activation is required to use the product as a retail version.The trial version has a 10-day usage limit, and you will no longer be able to use it after the limit has expired, so be sure to activate it.
Activation is possible even after the expiration date.
1. Launch the product
2. Click the [Activate] button in the window that appears.
3. Enter your name (in Roman letters) and activation key
4. Click the [Activate] button
5. If authentication is successful, the product will be installed.
*If you purchased from Sourcenext, two types of keys will be issued. Please enter the 12-digit serial number. The 21-digit serial number is used on Sourcenext and is not the activation key for AKVIS products.
[Operation method] How to change the display language to Japanese
1. Click the gear icon in the top right corner of the window. 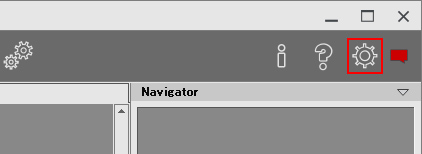
2. Click the [Language] drop-down at the top. 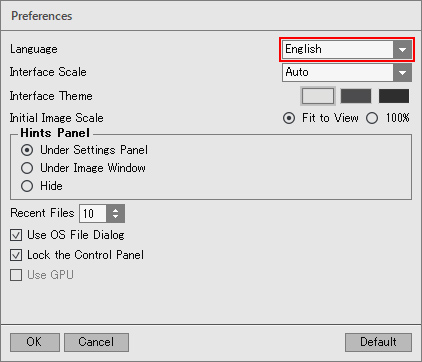
3. Select [Japanese]. 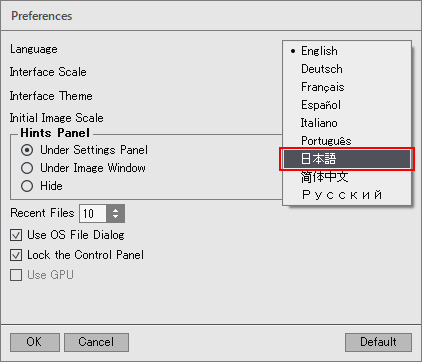
4. Click [OK] to switch the display to Japanese. 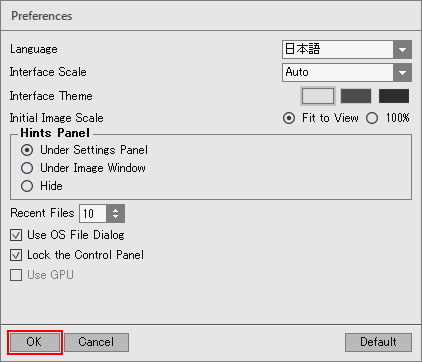
[Other] I entered the serial number but an error occurred and I can't activate it
The serial number (activation key) you enter into your AKVIS product will be a 12-digit number consisting of random alphanumeric characters.If you purchased your product from SourceNext or another company, you may have been issued multiple serial numbers, but in many cases, you may have entered the wrong number, resulting in an error.
Please make sure to enter the license number issued for your AKVIS product.
It is also possible that you have mistakenly entered something that is easily confused, such as an O or a zero.
Whenever possible, we recommend using copy and paste instead of entering information manually.
If you enter your name in Japanese, the characters will be garbled, so please enter it in Roman letters.